

Two membership paths matter when introducing iCafeApp: linking an existing venue account and creating a new one. The right path depends on whether the player already has a membership at your cafe. Explain that choice before asking regulars to register again.
For a venue using iCafeCloud member management, the useful outcome is a player who has joined the correct cafe and connected the appropriate member account. Installation is the beginning. Account linking is the part that connects the phone experience to the membership the player will use at your venue.

Getting Started with iCafeApp
Members can find iCafeApp on Google Play or the App Store. Ask them to install it on their own device, open the app and sign in. A player signing in with a new account is prompted to complete profile details before proceeding to the map of nearby centers.
Keep the introduction short. A new visitor needs to understand the purpose of the app before hearing about every member feature. Explain that it provides a way to find your cafe, join it and access the linked membership from a phone. For regulars, begin with the account they already have at the venue.
Use your venue name consistently when introducing iCafeApp at reception. A player should know which cafe to look for on the map or club list. If your community uses a shortened name for the business, include the displayed venue name in your installation instructions as well. That is a communication choice the venue can make before a member starts searching.
The first check is simple: the player has signed in and reached the center selection stage. Complete the profile prompts as they appear, then continue with finding your venue.
For staff preparing an introduction to iCafeApp, divide the explanation into a short welcome and an account decision. The welcome tells the visitor which venue to select. The decision comes later, when the player chooses an existing membership or creates one. This keeps the first conversation manageable while preserving the important account step.
Finding and Joining Your Gaming Cafe
After the initial profile stage, the map displays centers in the player's area. The member can select your venue there. The documented alternative is the "Found Clubs" option at the bottom of the map, which opens a list of clubs to choose from.
Ask the player to check the selected club before proceeding. The venue is the destination of the membership connection, so choosing it deserves a moment of attention. This is especially useful when a visitor is discovering your business through the app rather than following an explanation at reception.
The joining stage includes the "I agree to the Payment and Refund Policy" checkbox and the "Join" action. Give members time to read the policy shown for the process, then accept it and continue. Present this as part of joining through iCafeApp, using the wording that appears on the screen.
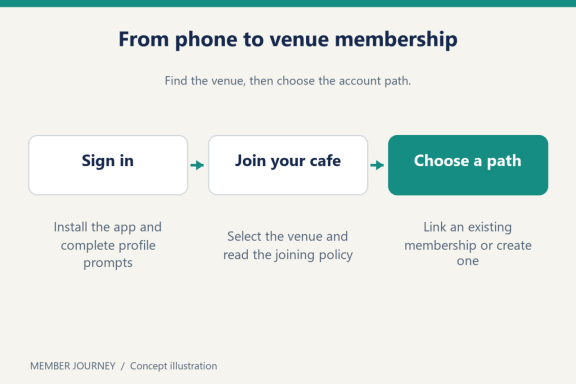
Joining the venue leads into the account choice. At this point, ask one practical question: does this player already have a member account at this cafe? The answer determines the next step. The official setup documentation is a useful reference for the person preparing your reception instructions.
Linking an Existing Membership or Creating a New One
This is the section to explain carefully to both staff and members. Signing in to iCafeApp and selecting a cafe establishes the context for the next action. The member then follows the appropriate route for their relationship with that particular venue.
For an existing member, the official installation guide describes linking to the venue membership using the same email address. Begin by identifying the membership already used at the cafe and checking the email associated with it. Then follow the existing-member linking option presented during the process.
Keep the object of the action clear: the player is connecting an existing membership. A regular customer who knows their usual venue login should hear that explanation before being offered a new-member route. It gives staff a concrete question to ask and gives the player a familiar account to identify.
For someone joining the venue for the first time, follow the documented route to create a new member account with a new email. Explain that this creates the membership they will use for that cafe. The distinction is about the player's existing relationship with the venue, even if both people installed the same app a few minutes earlier.
Player's situation | Account path | What staff should clarify |
Already a member at this cafe | Link the existing membership using the matching email address | Which existing venue membership is being connected |
Joining this cafe as a new member | Follow the new-member account route | Which venue the new membership belongs to |
Suppose two friends arrive together. One already visits the cafe, while the other is joining for the first time. Both can install iCafeApp and select the same venue. The regular follows the existing-member path, and the newcomer follows the new-member path. This is an example of how to explain the choice, rather than a separate registration procedure.
The table is useful for staff training because it keeps the decision small. Ask about the existing membership, identify the relevant email for linking, and follow the route shown. Avoid giving every player the same instruction simply because they are all using a phone.
An iCafeApp introduction can use two short descriptions: "Connect the membership you already use here" and "Create your membership at this cafe." These describe the purpose of each route rather than inventing extra button names. A member should understand the choice before making it, especially when they have visited the cafe before but are using the app for the first time.
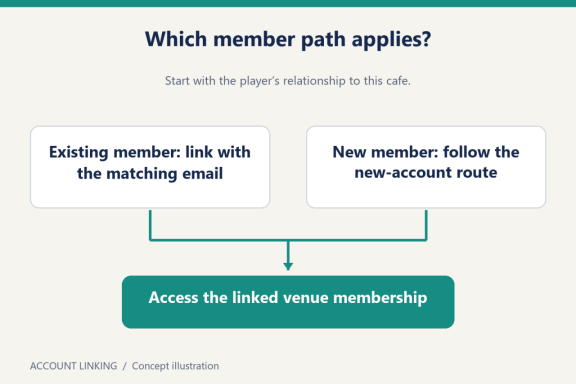
Once the appropriate route is complete, let the member access the account and review the information available. The visible result matters: the player should understand which venue membership they are using. Keep any reception explanation focused on the account selected, rather than suggesting that installation alone completes every step.
What Members Can Access After Linking
The documented member options include balance, club information, account details and bookings. These give your staff specific things to point out after the player completes the connection. Start with the information most relevant to that visit, such as finding the account details or viewing the balance.
A short handover works well: open the relevant member area, show where the information appears, and let the player find it again. The member does the action on their own phone. That provides a clearer finish to onboarding than a long spoken tour of menus they have yet to use.
Bookings are another member option listed in the installation guide. Mention where the player can access them when explaining iCafeApp. For a detailed booking explanation, use the venue's current booking process and terms. Keep the account introduction focused on connecting the member to the cafe and finding the available options.
For the venue owner planning this workflow, member onboarding belongs alongside the rest of the iCafeCloud setup. Review the current per-PC licensing options when planning software licensing. A venue evaluating the platform can request an iCafeCloud trial and include the member journey in its setup review.
Those links concern the venue's management software. The player-facing explanation should stay with the cafe membership: which account is connected, where its information appears and which action the member wants to take next. Your staff can discuss venue setup separately with the person responsible for the business.
Before finishing, ask the member to return to their account information. A player who can locate the venue and identify the connected membership has a clear starting point for using the app on a later visit.
You can also use this finish when teaching a new employee to introduce iCafeApp. Let the employee explain the venue selection, ask about an existing membership and describe the linked account options. The aim is a clear explanation that follows the player's circumstances. Familiarity with iCafeApp grows through those specific actions, with the member keeping control of their phone and their account throughout the introduction.
Questions Your Members May Ask
Can existing members link the account they already use?
Yes. The documented route links an existing venue membership using the same email address. Identify that membership first, then follow the linking option.
What should a first-time member do?
Select the correct cafe, complete the joining stage and follow the new-member account route. Explain which venue the membership belongs to.
What can members view after linking?
The documented options include balance, club information, account details and bookings. Show the member where to find the information they need in iCafeApp, then let them open it themselves.